Sunday 19 August 2012

OBIEE 11g6: Using external table to Filter BI Answers Report

When a BI Answers Report data need to be filtered based upon changing data, this is one method to achieve that.
Lets assume you need to report on products that are added or deleted on a daily basis. We can put that data into an Oracle table and use it as a filter to refine our output.

First lets create an SQL file Entries.sql  with some sample data as shown below:

Drop Table SAMP_ENTRIES;
CREATE TABLE "SAMP_ENTRIES"
   (    "ID" NUMBER,
    "STATUS" VARCHAR2(30)
   ) ;
Insert into SAMP_ENTRIES (ID,STATUS) values (1,'Bluetooth Adaptor');
Insert into SAMP_ENTRIES (ID,STATUS) values (2,'Game Station');
Insert into SAMP_ENTRIES (ID,STATUS) values (3,'MaxiFun 2000');
Insert into SAMP_ENTRIES (ID,STATUS) values (4,'PocketFun ES');
Insert into SAMP_ENTRIES (ID,STATUS) values (5,'Touch-Screen T5');
Insert into SAMP_ENTRIES (ID,STATUS) values (6,'LCD HD Television');

  1. connect to the database as BISAMPLE/BISAMPLE  user and password and execute the sql script as shown below:


  2. Open the RPD file in the "BI Administration Tool".
  3. Right click the "Connection Pool" in the "Physical" Layer and select "Import Metadata"
  4. Click "Next" button to reach to the screen below.
  5. Select the "SAMP_ENTRIES" table and click on the "Import Selected" button then click on the "Finish" button.


  6. Double Click on the "SAMP_ENTRIES" table in the "Physical" pane and under the "Keys" tab enter "ID" for the "Key Name" and select the "ID" under Columns.
  7. Click "OK" button.
  8. Drag the "SAMP_ENTRIES" table from the "Physical" layer to the "Business Model and Mapping" layer under the "Sample Sales" Business Model.
  9. Double Click on the "SAMP_ENTRIES" logical table and select the "Lookup table" checkbox and click the "OK" button.


  10. Drag the "SAMP_ENTRIES" logical table from the "Business Model and Mapping" pane to the "Presentation" pane and rename it to "Filter Vals".
  11. Select File -> Save and click yes when asked for the global consistency check.


  12. Now reload your RPD file by going to the URL: http://localhost:7001/em
  13. Navigate to the "Farm_bifoundation_domain" -> "Business Intelligence" -> coreapplication.
  14. Select the "Deployment" tab then the "Repository" tab.
  15. Select the "Lock and Edit Configuration".
  16. Select the "Browse" button and choose the RPD file that you just edited and saved.
  17. Then restart your server under the "Overview" tab.


  18. Now to create your report with the filter from the newly created SAMP_ENTRIES table.
  19. Goto the URL: http://locahost:9704/analytics
  20. Select the "New" -> "Analysis" -> "Sample Sales"
  21. Under the "Filter Vals" folder drag the "Status" column to the "Selected Columns" area.
  22. Save the report as "FilterVals"


  23. Now select the "New" -> "Analysis" -> "Sample Sales"
  24. Drag the "Product" and "Revenue" columns to the "Selected Columns" area.


  25. Select the "Product" options and filter and enter the below values as show in the screenshot.
  26. Click the "Browse" button and select the "FilterVals" report we saved above.
  27. Click the "OK" button.


  28. Now click the Results tab to show the results from the just the entries in the "SAMP_ENTRIES" table.


Summary:
As seen above we have use a filter first by importing the table "SAMP_ENTRIES" to our RPD file, then creating a "FilterVals" table to use as a filter to our final report.
We can automate the process of editin the "SAMP_ENTRIES" table by creating and executing our Entries.sql file when ever our data changes in real time.


Friday 3 August 2012

OBIEE 11g6: Deploying RPD on Linux to Access the Local Linux Oracle Database

Lets say we have working RPD with a "Data source name:" ORCL with a Username and Password : BISAMPLE/BISAMPLE.
Now we need to deploy this RPD on a Linux box where we have an Oracle XE Database installed with the ORACLE_SID: XE.
  1. First open up our created working Windows RPD as shown in the below screen.
  2. Observe that in the "Physical" layer pane "ORCL" is shown as the Database.


  3. Right Click and select "Rename" on the "ORCL" and rename it to the Equivalent connection sting in your tnsnames.ora e.g "XE" as show in screenshot below.
  4. Save your changes and click "Yes" button for the "Do you wish to check global consistency?" dialog.


  5. We go to the "Administration Tool" menu and select "Manage" -> "Variables..."
  6. Change the "BI_EE_HOME" variable's "Default Initializer:" from the Windows path to equivalent Unix path as show in the below screenshot:


  7. On the linux box where you have the OBIEE 11g "bi_server1" running have the following:
  8. Copy the Oracle's Database tnsnames.ora to the OBIEE 11g installed home.
    $ cp /u01/app/oracle/product/11.2.0/xe/network/admin/tnsnames.ora /home/srikanth/OracleFMW/oracle_common/network/admin/tnsnames.ora
    $ cd /home/srikanth/OracleFMW/oracle_common/network/admin/
  9. Make sure the XE or what ever ORACLE_SID is there is mentioned in the tnsnames.ora
    $ cat tnsnames.ora
    # tnsnames.ora Network Configuration File:
    XE =
      (DESCRIPTION =
        (ADDRESS = (PROTOCOL = TCP)(HOST = srilinlap)(PORT = 1521))
        (CONNECT_DATA =
          (SERVER = DEDICATED)
          (SERVICE_NAME = XE)
        )
      )
  10. Update your bash_profile so that you have the location to the newly copied tnsnames.ora location
    $ cat ~/.bash_profile
    ....
    PATH=$PATH:$HOME/.local/bin:$HOME/bin
    TNS_ADMIN=/home/srikanth/OracleFMW/oracle_common/network/admin
    export PATH TNS_ADMIN
  11. One all the above are done copy over the modified RPD file to the Linux machine and deployed it using the EM from the location http://localhost:7001/em.

Summary:
Basically we are modifying the "ORCL" string to whatever is mentioned in our tnsnames string, here for example is "XE".
Then we are copying over the tnsnames from ORACLE_HOME to OBIEE_HOME.
Then also setting the TNS_ADMIN variable to point to the new tnsnames.ora location


Wednesday 1 August 2012

OBIEE 11g6: Creation of Sales Reps Hierarchy with their Individual Revenue Totals

Here it will be shown on how to display the Hierarchy of Sales Reps along with their Individual Revenue earned.
The OBIEE default behavior is to show the Rolled Up Revenue to the Sales Rep's Manager or Root level.
Here we need to overcome that behavior and just show the Sum(Revenue) to each Sales Rep level.


Import the 4 tables as shown in below screenshot:
Create the corresponding Aliases i.e "D51 Sales Rep", "D52 Sales Rep Parent Child", "D53 Sales Rep Position" and "F51 Revenue" as shown in below screenshot:
Select and right click the newly created Aliases and select "Physical Diagram" -> "Object(s) and All Joins" as show in below screenshot:


Select the "New Join" icon and create the below joins using the expressions below:

"ORCL"."".""."D51 Sales Rep"."EMPLOYEE_KEY" = "ORCL"."".""."F51 Revenue"."EMPL_KEY"

"ORCL"."".""."D53 Sales Rep Position"."POSTN_KEY" = "ORCL"."".""."D51 Sales Rep"."POSTN_KEY"

You final "Physical Diagram" should look like in the below screenshot:


Right click in the "Business Model and Mapping" pane and select the "New Business Model..." and enter "SalesIndiv" and click "OK".
Drag the "D51 Sales Rep" and "F51 Revenue" Aliases from "Physical" pane to the "Business Model and Mapping" pane under the "SalesIndiv" as shown in below screenshot.


Select the both Logical tables as shown below and select "Business Model Diagram" -> "Whole Diagram".
Make sure the below link is created with Cardinality "0,1" on "D51 Sales Rep" side and "N" on the "F51 Revenue" side.


Right click on the "D51 Sales Rep" and select "Create Logical Dimension" -> "Dimension with Parent-Child Hierarchy..."


Select the "D51 Sales Rep_Key" for "Member Key:" and "Mgr id" for the "Parent Column" as shown in below screenshot.
Click the "Parent-Child Settings..." button.
Select the "Select Parent-Child Relationship Table" icon.
In the "Select Parent-Child Relationship Table" window select "ORCL" -> "D52 Sales Rep Parent Child" and click the "Select" button.
In the "Parent-Child Relationship Table Settings" window select the appropriate values for the 4 "Parent-Child Relationship Table Column Details" fields as shown in below screenshot:
Click the "OK" button to close the window.
Change the "D51 Sales RepDim" to "H51 Sales RepDim".
Click the "OK" button to close the "Logical Dimensions - D51 Sales RepDim" window.


Expand the "H51 Sales RepDim".
Delete the other columns and keep only the "Sales Rep Name" and "Sales Rep Number" under the "Detail" Level.
Right Click on the "Sales Rep Name" and select "New Logical Level Key..." and confirm the settings as in below screenshot:


Double Click on the "Detail" Logical Level and make sure the values as shown in the below screenshot:


Drag the "Sales Indiv" Business Model pane to the "Presentation" pane as shown in the below screenshot:
Select the "File" -> "Check Global Consistency" option on the main menu and fix any errors shown then save your repository as "SalesInd.rpd"


Open the Enterprise Manager Console and load your newly created RPD.
Open the URL: http://localhost:7001/em and login with administrator "weblogic".
Goto the "Farm_bifoundation_domain" -> "Business Intelligence" -> "coreapplication" in the left pane.
Select the "Deployment" tab  -> "Repository" tab.
Click the "Lock and Edit Configuration" section link.
Click the "Browse" button and locate your RPD  "SalesInd.rpd"
Enter the RPD password in both the "Repository Password" and "Confirm Password" fields.and hit "Apply".
Click on the "Activate Changes" link.
Click on the "Restart to apply recent changes" link.
Then in the "Overview" tab click the "Restart" button and "Yes" to the confirmation.


Now to test out our RPD in the Answers.
Goto the web URL:  http://localhost:9704/analytics and login as "weblogic"
Select the "New" -> "Analysis" -> "SalesIndiv" from the Answers menu.
Select the columns as shown below in the screenshot:


Click on the "Results" tab.
We can observe that not all the Sales rep "SUM(Revenue)" are shown in the table below.


The problem is that Sales Reps with "EMPL_KEY" 26, 23 and 22 do not have any rows associated with them in the SAMP_REVENUE_F(F51 Revenue) table, which results these and their sub-ordinates to be omitted in the hierarchy table above.


In order to fix that we will create some dummy rows for the 3 Sales Reps, as shown below observe that "EMPL_KEY" is given 26, 23 and 22.


Now we restart our BI services and we can see that all the Sales Rep members are shown now with their Revenue's totaled.


Summary:
Here in order to get the required Sales Rep Hierarchy output we have made changes to the Data Source Database. That can be avoided by initially implementing this logic to the ETL side.


Monday 30 July 2012

OBIEE 11g6: Hierarchical Roll-Up and Individual Total of Facts -- Part 1

Here we will be seeing on how to create and achieve two scenarios
  1. A Parent-Child Hierarchical Roll-Up of Revenues from sub-ordinate employees to Root/Top Employee.
  2. In the other we will be seeing how to create and achieve Parent-Child Hierarchy of Employees showing their individual Revenues.

First we have to create our RPD to model out Dimensions and Facts to support the Hierarchical of Sales Representatives.
Secondly we create our report using the "Oracle BI Answers" to show these 2 scenarios.


  1. First to create our star schema, open the "Oracle BI Administration Tool" from "Start" menu.
  2. In the Menu select "File" -> "New Repository..."


  3. When the below window comes up enter values for the Name, "Repository Password:" and "Retype Password:" fields as shown in below screenshot.
  4. Click "Next" button to continue


  5. When the below screen appears select the "ORCL" entry and enter values for the "User Name:" and "Password:" fields as shown below screen shot.
  6. Click the "Next" button to continue.


  7. When the below screen appears leave the defaults as shown in below screenshot and click "Next" button to continue.


  8. When the below screen appears select the four tables as show below and click the "import selected" button.
  9. Click "Finish"  to continue.


  10. In the Main "Administration Tool" window right click and select "New Object" -> Alias and enter "D41 Sales Rep"  and then click "OK" button to create an alias as shown below:


  11. Similarly go ahead and create the next 3 aliases as show below i.e.: "D42 Sales Rep Parent Child", "D43 Sales Rep Position" and "F4 Revenue" as show in below screenshot.
  12. Select all the newly created table, right click and select "Physical Diagram" -> "Object(s) and All Joins" .


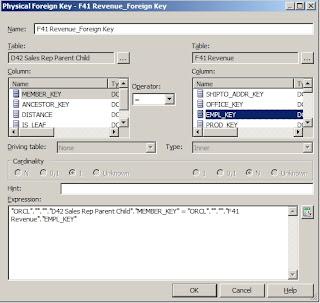
  13. On the Menu select "New Join" then click on the "F41 Revenue" table then click on the "D42 Sales Rep Parent Child" table.
  14. As show in the below screenshot create the Expression by select first the "MEMBER_KEY" then the "EMPL_KEY" and clink on the "OK" button.
  15. This will create an error link the two tables.


  16. Similarly create a "New Join" between "D42 Sales Rep Parent Child" and "D41 Sales Rep" tables as show in below screen shot by selecting the "EMPLOYEE_KEY" and "ANCESTOR_KEY".


  17. Similarly create a "New Join" between "D41 Sales Rep" and "D43 Sales Rep Position" tables as show in below screen shot by selecting the "POSTN_KEY" and "POSTN_KEY".


  18. The Final joins created is as shown in below screenshot.


  19. Right click in the "Business Model and Mapping" pane and select "New Business Model..." and enter "SalesRoot" as show in below screenshot.
  20. Click the "OK" button to close the window.


  21. From the Physical pane to the "Business Model and Mapping" pane drag the "D41 Sales Rep" and "F41 Revenue" tables to under the "SalesRoot" model as show in below screenshot.
  22. Next select both the tables, then right click and select "Business Model Diagram" -> "Whole Diagram".


  23. Create the following join between the "F41 Revenue" and "D41 Sales Rep" is created and the "Cardinality" is as shown in below screenshot.


  24. Make sure the below join is created as show in screenshot.


  25. Rename your tables and columns as show in below screen shot.


  26. Create a hierarchy by right clicking on "D41 Sales Rep" table and select "Create Logical Dimension" -> "Dimension with Parent-Child Hierarchy..." as shown in below screen shot.


  27. Make sure to select the "Member Key:" value as "D41 Sales Rep_Key" and "Parent Column:" value as "Mgr id" as show in below screen shot.
  28. Click on the "Parent-Child Settings..." button.


  29. In the "Parent-Child Relationship Table Settings" window click on the "Select Parent-Child Relationship Table" icon.
  30. In the "Select Parent-Child Relationship Table" window browse to the "ORCL" -> "SAMP_EMPL_PARENT_CHILD_MAP" table in the left pane and select it, then click on the "Select" button.


  31. In the window shown in below screen shot select the four values for the respective fields as shown in below screenshot.
  32. Click the "OK" button.


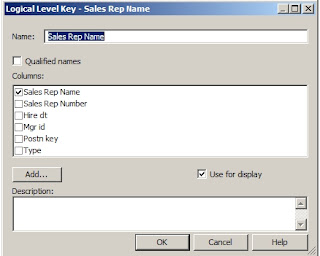
  33. Right Click on the "Sales Rep Name" column and select the "New Logical Level Key...".


  34. Make sure that the values are as shown below and the "Use for display" checkbox is selected as shown in below screenshot.


  35. Expand the "H41 Sales RepDim" Hierarchy and double click the "Detail" folder to open the below window as shown in below screenshot.
  36. Check the checkbox for the "Sales Rep Name" and uncheck the checkbox for the "Sales Rep Number" and make sure the "Parent" value is assigned to "Mgr id".
  37. Click "OK" button to close the window.


  38. Double click on the "LTS1 Revenue" fact logical source table.
  39. Goto the "Content" tab in the "Logical Table Source - LTS1 Revenue" window as show in below screenshot.
  40. For the "Logical Level" select the "Detail" value.
  41. Click "OK" button to close the window.


  42. Double Click on the "LTS1 Sales Rep" Dimension Logical Source Table.
  43. Click on the "Add" Icon.


  44. Select the two tables on the right pane and click on the "Select" button as shown in the below screen:


  45. Make sure that  the below two joins are created as shown in the below screenshot.
  46. Click on the "OK" button to close the window.


  47. Drag the "SalesRoot" from the "Business Model and Mapping" pane to the "Presentation" pane as shown in the below screenshot.
  48. This finishes the creation of the "SalesRoot" Business Model.
  49. Select the "File" -> "Check Global Consistency" option on the main menu and fix any errors shown then save your repository.