Monday, 30 July 2012

OBIEE 11g6: Hierarchical Roll-Up and Individual Total of Facts -- Part 1

Here we will be seeing on how to create and achieve two scenarios
  1. A Parent-Child Hierarchical Roll-Up of Revenues from sub-ordinate employees to Root/Top Employee.
  2. In the other we will be seeing how to create and achieve Parent-Child Hierarchy of Employees showing their individual Revenues.

First we have to create our RPD to model out Dimensions and Facts to support the Hierarchical of Sales Representatives.
Secondly we create our report using the "Oracle BI Answers" to show these 2 scenarios.


  1. First to create our star schema, open the "Oracle BI Administration Tool" from "Start" menu.
  2. In the Menu select "File" -> "New Repository..."


  3. When the below window comes up enter values for the Name, "Repository Password:" and "Retype Password:" fields as shown in below screenshot.
  4. Click "Next" button to continue


  5. When the below screen appears select the "ORCL" entry and enter values for the "User Name:" and "Password:" fields as shown below screen shot.
  6. Click the "Next" button to continue.


  7. When the below screen appears leave the defaults as shown in below screenshot and click "Next" button to continue.


  8. When the below screen appears select the four tables as show below and click the "import selected" button.
  9. Click "Finish"  to continue.


  10. In the Main "Administration Tool" window right click and select "New Object" -> Alias and enter "D41 Sales Rep"  and then click "OK" button to create an alias as shown below:


  11. Similarly go ahead and create the next 3 aliases as show below i.e.: "D42 Sales Rep Parent Child", "D43 Sales Rep Position" and "F4 Revenue" as show in below screenshot.
  12. Select all the newly created table, right click and select "Physical Diagram" -> "Object(s) and All Joins" .


  13. On the Menu select "New Join" then click on the "F41 Revenue" table then click on the "D42 Sales Rep Parent Child" table.
  14. As show in the below screenshot create the Expression by select first the "MEMBER_KEY" then the "EMPL_KEY" and clink on the "OK" button.
  15. This will create an error link the two tables.
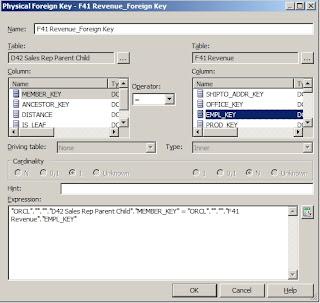


  16. Similarly create a "New Join" between "D42 Sales Rep Parent Child" and "D41 Sales Rep" tables as show in below screen shot by selecting the "EMPLOYEE_KEY" and "ANCESTOR_KEY".


  17. Similarly create a "New Join" between "D41 Sales Rep" and "D43 Sales Rep Position" tables as show in below screen shot by selecting the "POSTN_KEY" and "POSTN_KEY".


  18. The Final joins created is as shown in below screenshot.


  19. Right click in the "Business Model and Mapping" pane and select "New Business Model..." and enter "SalesRoot" as show in below screenshot.
  20. Click the "OK" button to close the window.


  21. From the Physical pane to the "Business Model and Mapping" pane drag the "D41 Sales Rep" and "F41 Revenue" tables to under the "SalesRoot" model as show in below screenshot.
  22. Next select both the tables, then right click and select "Business Model Diagram" -> "Whole Diagram".


  23. Create the following join between the "F41 Revenue" and "D41 Sales Rep" is created and the "Cardinality" is as shown in below screenshot.


  24. Make sure the below join is created as show in screenshot.


  25. Rename your tables and columns as show in below screen shot.


  26. Create a hierarchy by right clicking on "D41 Sales Rep" table and select "Create Logical Dimension" -> "Dimension with Parent-Child Hierarchy..." as shown in below screen shot.


  27. Make sure to select the "Member Key:" value as "D41 Sales Rep_Key" and "Parent Column:" value as "Mgr id" as show in below screen shot.
  28. Click on the "Parent-Child Settings..." button.


  29. In the "Parent-Child Relationship Table Settings" window click on the "Select Parent-Child Relationship Table" icon.
  30. In the "Select Parent-Child Relationship Table" window browse to the "ORCL" -> "SAMP_EMPL_PARENT_CHILD_MAP" table in the left pane and select it, then click on the "Select" button.


  31. In the window shown in below screen shot select the four values for the respective fields as shown in below screenshot.
  32. Click the "OK" button.


  33. Right Click on the "Sales Rep Name" column and select the "New Logical Level Key...".


  34. Make sure that the values are as shown below and the "Use for display" checkbox is selected as shown in below screenshot.
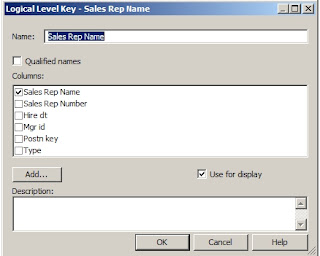


  35. Expand the "H41 Sales RepDim" Hierarchy and double click the "Detail" folder to open the below window as shown in below screenshot.
  36. Check the checkbox for the "Sales Rep Name" and uncheck the checkbox for the "Sales Rep Number" and make sure the "Parent" value is assigned to "Mgr id".
  37. Click "OK" button to close the window.


  38. Double click on the "LTS1 Revenue" fact logical source table.
  39. Goto the "Content" tab in the "Logical Table Source - LTS1 Revenue" window as show in below screenshot.
  40. For the "Logical Level" select the "Detail" value.
  41. Click "OK" button to close the window.


  42. Double Click on the "LTS1 Sales Rep" Dimension Logical Source Table.
  43. Click on the "Add" Icon.


  44. Select the two tables on the right pane and click on the "Select" button as shown in the below screen:


  45. Make sure that  the below two joins are created as shown in the below screenshot.
  46. Click on the "OK" button to close the window.


  47. Drag the "SalesRoot" from the "Business Model and Mapping" pane to the "Presentation" pane as shown in the below screenshot.
  48. This finishes the creation of the "SalesRoot" Business Model.
  49. Select the "File" -> "Check Global Consistency" option on the main menu and fix any errors shown then save your repository.

OBIEE 11g6: Hierarchical Roll-Up and Individual Total of Facts -- Part 2

  1. Now we are onto creating the "SalesIndiv" Business Model.
  2. In the "Physical" layer pane create the 4 aliases as we did previously but this time name them "D51 Sales Rep" , "D52 Sales Rep Parent Child" , "D53 Sales Rep Position" and "F51 Revenue" accordingly.


  3. Select all the newly created 4 alias tables and right click and choose "Physical Diagram" -> "Object(s) and All Joins"


  4. Create the following Join with "EMPLOYEE_KEY" and "EMPL_KEY" as shown in below screenshot.
  5. Click "OK" to close the window.


  6. Create the following join by selecting the "POSTN_KEY" and "POSTN_KEY" as shown in below screenshot.
  7. Click "OK" button to close the window.


  8. Finally you should end up with the following joins as shown in below screenshot.
  9. Close the "Physical Diagram" window by clicking the "X" button.


  10. Now create a new model "SalesIndiv" in the "Business Model and Mapping" Pane.
  11. Drag the 2 tables "D51 Sales Rep" and "F51 Revenue" to the "SalesIndiv" Business model.
  12. Select both the tables and Right click, select "Business Model Diagram" -> "Whole Diagram" .


  13. Make sure that the link is shown as in below screenshot.


  14. Double click on the "LTS1 Sales Rep" and Click on the "+" icon.
  15. In the Browse window select both the tables and click the "Select" button as shown in below screenshot.


  16. Make sure that the two joins have been created as shown in below screenshot.


  17. Select the "D51 Sales Rep" and right click and select the "Create Logical Dimension" -> "Dimension with Parent-Child Hierarchy"


  18. Make sure that "D51 Sales Rep_Key" and "Mgr id" are selected for the "Member Key:" and "Parent column:" values respectively as shown in below screenshot.


  19. Click on the "Parent-Child Settings..." button.
  20. Click on the "Select Parent-Child Relationship Table" icon.
  21. In the new window that comes up select the "D52 Sales Rep Parent Child" table and click the "Select" button.


  22. Click "OK" on the "Logical Dimension - D51 Sales RepDim" window to close it.
  23. Select the appropriate "MEMBER_KEY", "ANCESTOR_KEY" , "DISTANCE" and "IS_LEAF" values as shown in below screenshot.


  24. Right click on the "Sales Rep Name" and select the "New Logical Level Key..." as shown in below screenshot.


  25. Make sure that the values correspond to that shown in the below screenshot:
  26. Click "OK" button to close the window.


  27. Click on the "Detail" Level folder and confirm below values are shown as in below screenshot.
  28. Click "OK" button to close the window.


  29. Drag the "SalesIndiv" Business Model from the "Business Model and Mapping" pane to the "Presentation" pane and validate everything is ok as shown in below screenshot.
  30. Select the "File" -> "Check Global Consistency" option on the main menu and fix any errors shown then save your repository.


  31. We are now going to implement our hierarchical and individual roll-up reports.
  32. Open up the web browser and enter the URL: http://localhost:9704/analytics
  33. On the OBIEE Menu select New->Analysis->Select Subject Area->SalesRoot.
  34. Select the two columns as shown in below screenshot:


  35. For the 2nd column, select Options and "Edit Formula".
  36. In the "Column Formula" field enter the below formula as seen in the screenshot:


  37. Now goto the "Results" tab and we can observe that all the totals are added up at the top most Sales Rep: Michele Lombardo.


  38. No we create for the individual roll-up totals.
  39. On the OBIEE Menu select New->Analysis->Select Subject Area->SalesIndiv.
  40. Select the 2 columns as shown in the below screenshot:


  41. Select the 2nd column options "Edit formula" and enter the below formula as shown in below screenshot:


  42. Now click the "Results" tab to see the output.
  43. Here we can see that the Individual Roll-Up of totals where the Sales Rep: Michele Lombardo total Revenue made is $110,000.00 dollars where as compared to the
  44. previous Total Hierarchical Roll-Up was : 50,000,000.00 which was the totals of his and his sub-ordinates totals.


  45. There is one more thing that is observed above in the report is that the Sales Rep: Sophie Bergman and her sub-ordinates are not listed here since "Sophie Bergman" has no rows which contributes to the Revenue, as can seen in the below screenshot:


  46. In order to list these "No Rows" Sales Reps i.e. Sophie Bergman and her sub-ordinates we would have to go with an alternate procedure that includes the "UNION" reports.
  47. Open your web browser to the URL: http://localhost:9704/analytics and login as admin user "weblogic"
  48. Select the  New->Analysis->Select Subject Area->SalesIndiv.
  49. Select the 2 columns "Sales Rep Name" and "Revenue".
  50. Select the 2nd column options "Edit formula" and enter SUM("F51 Revenue"."Revenue") formula and click the "OK" button.
  51. Next select the "Combine results based on union, intersection, and difference operations" icon i.e green "+" icon.
  52. Under the "Select Subject Area" section select "SalesIndiv" as shown in the below screenshot.


  53. Drag the "Sales Rep Name" to the "Add Column(Sales Rep Name)" section.
  54. Drag the "Sales Rep Number" to the "Add Column(SUM(Revenue))" section.
  55. On the 2nd "Sales Rep Number" column select options "Edit formula" and enter ' ' i.e two single quotes with a space in between and click "OK" button.


  56. Your final Union Report should look as shown in the below screenshot.


  57. Click on the "Result" tab to display the report as shown in the below screen:
  58. You can notice that Sales Rep: Sophie Bergman and her sub-ordinates are now seen but we have lost the Hierarchical structure that exists above.


Note:
In order to get the "SalesIndiv" subject area to work with the hierarchical layout and the Individual Roll-Up criteria, one way is to get those members with out any rows or table entries to be updated with entries for atleast one row with a value of "0" for revenue field.
With this we would not require the UNION report workaround.

Summary:
As can be seen we have ran through a lot of steps to create our Business Models for both the hierarchical and Individual roll-up scenarios.
After demonstrating the lack of support to the 0-rows members to show up in the hierarchical order, we have created one work around to view those members.
Maybe there is a way for us to come up a Hierarchy for the Individual roll-up and I will be happy if some one can post a comment and point me in that direction.