- A Parent-Child Hierarchical Roll-Up of Revenues from sub-ordinate employees to Root/Top Employee.
- In the other we will be seeing how to create and achieve Parent-Child Hierarchy of Employees showing their individual Revenues.
First we have to create our RPD to model out Dimensions and Facts to support the Hierarchical of Sales Representatives.
Secondly we create our report using the "Oracle BI Answers" to show these 2 scenarios.
- First to create our star schema, open the "Oracle BI Administration Tool" from "Start" menu.
- In the Menu select "File" -> "New Repository..."

- When the below window comes up enter values for the Name, "Repository Password:" and "Retype Password:" fields as shown in below screenshot.
- Click "Next" button to continue

- When the below screen appears select the "ORCL" entry and enter values for the "User Name:" and "Password:" fields as shown below screen shot.
- Click the "Next" button to continue.

- When the below screen appears leave the defaults as shown in below screenshot and click "Next" button to continue.

- When the below screen appears select the four tables as show below and click the "import selected" button.
- Click "Finish" to continue.

- In the Main "Administration Tool" window right click and select "New Object" -> Alias and enter "D41 Sales Rep" and then click "OK" button to create an alias as shown below:

- Similarly go ahead and create the next 3 aliases as show below i.e.: "D42 Sales Rep Parent Child", "D43 Sales Rep Position" and "F4 Revenue" as show in below screenshot.
- Select all the newly created table, right click and select "Physical Diagram" -> "Object(s) and All Joins" .

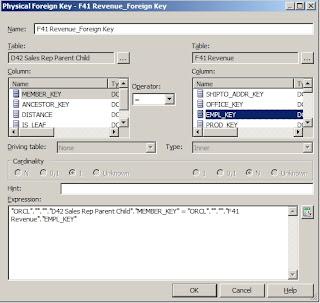
- On the Menu select "New Join" then click on the "F41 Revenue" table then click on the "D42 Sales Rep Parent Child" table.
- As show in the below screenshot create the Expression by select first the "MEMBER_KEY" then the "EMPL_KEY" and clink on the "OK" button.
- This will create an error link the two tables.
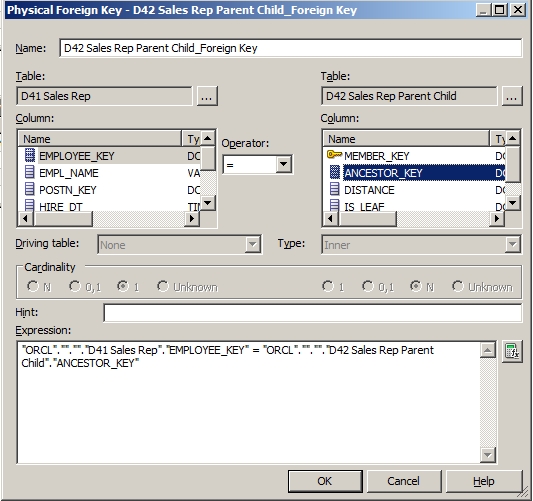
- Similarly create a "New Join" between "D42 Sales Rep Parent Child" and "D41 Sales Rep" tables as show in below screen shot by selecting the "EMPLOYEE_KEY" and "ANCESTOR_KEY".

- Similarly create a "New Join" between "D41 Sales Rep" and "D43 Sales Rep Position" tables as show in below screen shot by selecting the "POSTN_KEY" and "POSTN_KEY".

- The Final joins created is as shown in below screenshot.

- Right click in the "Business Model and Mapping" pane and select "New Business Model..." and enter "SalesRoot" as show in below screenshot.
- Click the "OK" button to close the window.

- From the Physical pane to the "Business Model and Mapping" pane drag the "D41 Sales Rep" and "F41 Revenue" tables to under the "SalesRoot" model as show in below screenshot.
- Next select both the tables, then right click and select "Business Model Diagram" -> "Whole Diagram".

- Create the following join between the "F41 Revenue" and "D41 Sales Rep" is created and the "Cardinality" is as shown in below screenshot.

- Make sure the below join is created as show in screenshot.

- Rename your tables and columns as show in below screen shot.

- Create a hierarchy by right clicking on "D41 Sales Rep" table and select "Create Logical Dimension" -> "Dimension with Parent-Child Hierarchy..." as shown in below screen shot.

- Make sure to select the "Member Key:" value as "D41 Sales Rep_Key" and "Parent Column:" value as "Mgr id" as show in below screen shot.
- Click on the "Parent-Child Settings..." button.

- In the "Parent-Child Relationship Table Settings" window click on the "Select Parent-Child Relationship Table" icon.
- In the "Select Parent-Child Relationship Table" window browse to the "ORCL" -> "SAMP_EMPL_PARENT_CHILD_MAP" table in the left pane and select it, then click on the "Select" button.

- In the window shown in below screen shot select the four values for the respective fields as shown in below screenshot.
- Click the "OK" button.

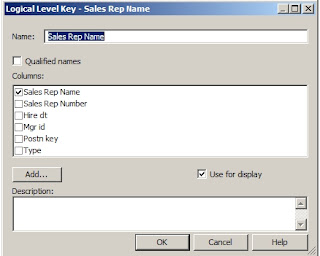
- Right Click on the "Sales Rep Name" column and select the "New Logical Level Key...".

- Make sure that the values are as shown below and the "Use for display" checkbox is selected as shown in below screenshot.
- Expand the "H41 Sales RepDim" Hierarchy and double click the "Detail" folder to open the below window as shown in below screenshot.
- Check the checkbox for the "Sales Rep Name" and uncheck the checkbox for the "Sales Rep Number" and make sure the "Parent" value is assigned to "Mgr id".
- Click "OK" button to close the window.

- Double click on the "LTS1 Revenue" fact logical source table.
- Goto the "Content" tab in the "Logical Table Source - LTS1 Revenue" window as show in below screenshot.
- For the "Logical Level" select the "Detail" value.
- Click "OK" button to close the window.

- Double Click on the "LTS1 Sales Rep" Dimension Logical Source Table.
- Click on the "Add" Icon.

- Select the two tables on the right pane and click on the "Select" button as shown in the below screen:

- Make sure that the below two joins are created as shown in the below screenshot.
- Click on the "OK" button to close the window.

- Drag the "SalesRoot" from the "Business Model and Mapping" pane to the "Presentation" pane as shown in the below screenshot.
- This finishes the creation of the "SalesRoot" Business Model.
- Select the "File" -> "Check Global Consistency" option on the main menu and fix any errors shown then save your repository.


No comments:
Post a Comment